
Barred Owl Box Plans
Get a 4x8' sheet of 3/4" exterior-grade, pressure-treated plywood. If you don't use the treated plywood, you can expect the box to fall apart in a few years. Have the lumber shop cut it in half lengthwise. Take these home and get out your power tools. Cut one of the now 2x8’ halves every 19" (see below). You’ll have 5 pieces 24x19". These will be the 4 sides of the box plus the top. You’ll need to cut the bottom out of the other half of your original piece of plywood. (You’ll wind up with quite a bit of left over wood. If you can get your lumber yard to sell you a 2x8’ sheet, you can buy a 2x2’ piece to cut the bottom out of. The bottom can be 1/2” thick.)
A note on size. Almost every set of plans I've seen for Barred Owls are quite a bit smaller than our plan. Most have about a 12-13" square floor plan. Our box may be considered a McMansion by some, but we've watched the young in the nests via video cameras and they use all the space we give them. Barred Owls will sometimes raise 4 young. It would be awfully cramped for 4 young and the female in 1 square foot of nest box. Go ahead and splurge with some extra plywood. You could cut this down to 15"x15" on the floor plan, but i wouldn't go any smaller than that.
Stain all the pieces with a deck preservative before assembly. When the stain has dried, assemble the 4 sides. Use 2" deck screws to assemble the box. Don’t spare the screws, especially around the sides! (Make sure no screws protrude into the box, where they might injure the birds.) Depending on the width of the plywood and how you cut the pieces, the bottom dimension will change, so it's easiest to put the 4 sides together and measure what you need for the bottom. Cut this from the remaining plywood and fasten it to the 4 sides. You can wait until the 4 sides and bottom are assembled before cutting the entrance in the front of the box. Cut in half the narrow piece of plywood left over from the bottom. Stack the two pieces and screw them together. Then screw this into the inside of the box, a few inches below the entrance. This is not necessary, but gives the youngsters an easier way to get up into the entrance of the box. They like to stand and investigate the world outside their box prior to their departure at about 5 weeks of age. We have had one bird fall out of a box a bit prematurely because it didn't have a step to get up. He jumped up and kept right on going! He made it through the experience, but could have been injured.
It is much easier to cut the entrance hole as indicated in the diagram below than to try to cut a hole in the front, especially if you don't have a jigsaw. There is no reason, other than esthetics, to have a round or oval entrance to the box. The owls don't care!
 |
You should use the 10" x 10" piece you cut out for the entrance to make a "front porch." Get a couple of small L braces and put a landing platform on the front of the box, just below the entrance. The young love to sit on it before they fledge. |
|
|
Drill some 1" drainage holes in the bottom of the box and 4 or 5 holes near the top of the side (not the back) of the box that you will attach to the tree, if you are going to use hex-head lag screws to mount the box to the tree. If you're going to use the new highly recommended method using wire cable to "tie" the box to the tree, drill two 3/8" holes at the upper corners of the side of the box that will be against the tree. |
Mounting the Box
Caution! This can be a dangerous process. Use a safety belt while
up in the tree and make sure anyone below you is wearing a hard hat. If
you're at all uncomfortable with the procedure, you should hire a tree surgeon to
install the box. No one should stand beneath the box
while the box is being installed.
The box will be heavy, so it will have to be pulled up into the tree with a
rope over a branch above where it will be fastened.
|
Getting the box up the tree. In this picture, the box is on the ground, ready to be pulled up. Someone goes up a ladder and passes the red rope over a branch above where the box will be mounted on the tree. As the red rope is pulled up, it takes the top pulley up with it. Someone on the ground feeds the green rope into the pulley. When the top pulley is where we want it, we tie off the red rope and use the green rope and pulleys to pull the box up into the tree, were we wire it to the tree, as per the instructions below. The box should be about 12-20' off the ground. There is no reason to mount it higher and good reasons (accessibility) not to. There is also no reason to clean the box out between nesting seasons. You may, however, need to get to the box to take a squirrel nest out of it. Squirrels nest in the fall when Barred Owls are not paying much attention to their nest cavities. Squirrels may fill the box up with sticks and leaves, making it impossible for owls to use it. If you have some over-eager tree surgeon mount the box 40' up in a tree, you won't be able to get up to it to evict squirrels. |
 |
Attaching the box to the tree.
The New Way: An alternative method of mounting the box has recently been suggested. I've tried it and will mount all boxes going forward using a modification of the original suggestion of hanging the box on a tree with a chain. The chain is attached to an eye bolt in the upper corner of the side of the box, passed around the trunk and over a limb and then fastened (with a "quick link") to an eyebolt on the other corner of the side of the box. Some slack in the chain will allow for growth of the tree, which is an issue when one attaches the box to the tree with lag screws.
 |
I've found that 3/16" diameter plastic-coated 'wire rope' can be substituted for the chain. We now drill two holes in the side of the box and pass the wire rope through them, with a simple overhand knot tied in the cable inside the box just where it passes out of the box. This keeps the box from sliding on the cable. |
 |
When you're up in the tree, get the box in position and pass the wire around the tree and over a limb (you may have to screw a lag screw into the trunk to support the wire if there are no convenient branches at the height you want) and through the loop on the end of the wire coming out of the front of the box. Fasten with a couple of clamps and you're done! This is much faster and better all around than lag screwing the box to the tree. |
 |
Here's a box mounted with our new wire-rope technique. Note the the opening of the box faces sideways, not away from the tree. This is important for access to the box. With the entrance this way, your ladder will rest against the tree and access to the box is easy. |
The Old Way: Use 3-4" lag screws (with washers) to fasten the box to the tree. You will have to get them started with a hammer (especially if you’re putting the box into an oak!). Once you get one screw set into the tree, get the box more or less level and screw in 3 or 4 more of the lag screws. Leave most of the screws with at least a half inch of free play. As a tree grows, it will eventually push the box right off the screws if you tighten them all down.
It is very important to
put
a couple of inches of wood chips or pine straw in bottom of the box before
installing it. Owls don’t carry sticks and build a nest, so they need
something to keep the eggs from rolling around in the bottom of the box.
Important observations.
The entrance to the box does not face away from the tree, but is on what would seem to be the side of the box. This is essential for future access to the box.
Do
not cut corners on construction! A few years
ago a box built (not by us!) with too few, too short
screws fell off the tree it was fastened to, and the two young that had been in
the box died of exposure during the night. Use 3/4” plywood, at least for the
four sides. Use 2” screws about every 4-6” all the way around. Screws are
cheap and it’s a bummer to find your box on the ground with dead babies in it.
You
could get away with 1/2” plywood if you use 2”x2” strips on the inside
joints and screw the sides of the board into the 2x2s. The big issue is that a
screw going lengthwise into 1/2” plywood does not have much of a purchase. As
the plywood ages and begins to delaminate a bit, screws will pull out easily.
3/4” plywood is much better for this reason.
Some shingles on the roof won't hurt and may extend the life of the box. If you're carpentry skills are above average, cutting your sides to put a bit of a slant to the roof may also help, but is not necessary.
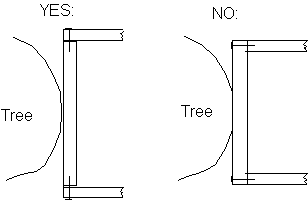
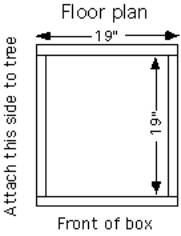
Pay
attention to the floor plan below. (This is either a bird's eye view or a worm's
eye view of the box.) It is important that the front and back of the box overlap
the ends of the piece you’re going to lag screw into the tree. This piece will
never come off the tree, but the rest of the box can easily pull off the side if
not well attached (like the illustration on the right). For added security,
L-braces can reinforce this all-important junction.

If the tree you're mounting the box on is narrow, you might try some wedges behind the box as indicated below.

![]()
